
The suspension of a mountain bike is essential for absorbing the forces generated while pedaling, protecting both the rider and the frame. Within this system, the shock absorber stands out as one of the most important components, especially in full-suspension mountain bikes, where it plays a key role on technical terrain. However, it is also a component prone to wear, which makes it essential to perform basic adjustments and maintenance to prolong its lifespan and avoid costly breakdowns that could render it unusable prematurely.
Although hardtail mountain bikes do not have a rear shock absorber, their maintenance is still essential for other suspension components, such as the front fork, to ensure optimal performance. The good news is that many of these maintenance tasks are simple and can be done at home without complications.
Basic Shock Absorber Adjustments
There are three types of basic adjustments to which you should pay special attention.
1. Air Pressure: SAG or Sagging
If you want your shock absorber to work properly, you must start by calibrating the air chamber pressure, adjusting it to your needs. The first thing you should do is buy a good pump specifically for suspensions, if you don't already have one. With it, we are going to inflate the shock absorber and regulate the SAG or sagging. This is identified as the percentage of the carrera of the shock absorber body (lower bar) that enters the sleeve when compressed by the weight of the rider and their equipment. Without exerting any other type of force.

👉 Related: 5 basic adjustments for your bike's suspension
Through this general guide you can have a starting point on what SAG is appropriate depending on the type of MTB or riding:
- XC (100 – 120 mm): 10 – 20%.
- Trail/All Mountain (120 – 150 mm): 20 – 30%.
- Enduro/Freeride (150 – 180 mm): 30 – 40%.
- DH: 30 – 40%.
Benefits. Adjusting the SAG involves adapting your weight to the shock absorber so that it works correctly. In this way, it will operate with progressive compressions adapted to the terrain, without straining its internal mechanism or the bike’s linkage. Remember that the linkage is the part of the frame that connects the rear wheel to the main triangle, a basic element for the proper functioning of bikes with dual suspension. A correct SAG adjustment is also a basic starting point for the other settings (rebound and compression) to be correct.
2. Rebound
The rebound adjustment is made through a dial or wheel, usually painted red. It is located on the shock absorber sleeve and regulates the extension speed after receiving an impact. After adjusting the SAG, it is advisable to modify the rebound to suit your riding needs and type of terrain. Using the dial, which moves with clicks or small stops, you can have a fast rebound, which will recover better from bumps or small, consecutive obstacles, or a slow rebound, for less irregular terrain with larger obstacles.

Benefits. A well-calibrated rebound provides stability when riding the bike on rough terrain. Mechanically, it also delays the wear of the internal cartridge and the seals (components that prevent dirt from getting inside the shock absorber).
3. Compression
Finally, you need to adjust the shock absorber’s compression, using a specific dial; generally, blue in color. This is the opposite adjustment to rebound. That is, it regulates the speed at which the shock absorber body compresses, while rebound controls the extension. It can have from two to twelve positions, depending on the model, including the total lockout position. Some shock absorbers designed for enduro or downhill also have two dials to separately adjust low-speed compression (from pedaling and small bumps) and high-speed compression (from large obstacles).
Benefits. Having the right compression for the type of surface effectively filters out terrain irregularities, reduces vibrations, and prevents oscillations while pedaling. This way, you make the most of your energy to move forward and pedaling becomes more efficient. It will also prevent bottoming out to avoid damaging the internal mechanism of the cartridge or the seals.
Cleaning and lubrication
In addition to these three adjustments (pressure, rebound, and compression), it is important to keep the shock absorber clean. Use water and soap. With a dry cloth, wipe both the sleeve and the body and their joint, as well as the dials and linkages to the linkage. Do this before and after each ride. This will prevent dust, mud, or water from entering the inside of the shock absorber, which can accelerate the wear of the seals. Optionally, you can reduce friction and achieve smoother and more precise operation by lubricating externally the body of the shock absorber. To do this, always use oil and lubricants specifically designed for suspensions. Make sure to remove any excess with a dry cloth.
Internal cleaning and maintenance: when to do them
As important or even more so than frequent external cleaning is performing the periodic maintenance of the shock absorber. Here, we recommend doing it at a specialized workshop, although the major suspension brands (Fox, RockShox, SR Suntour) offer tutorials so you can do it yourself. If you dare, keep in mind that you will need specific tools: seal kit, gaskets, specific oil, rubber mallet, etc.
📺 Here is a RockShox video to help you learn how to properly maintain your shock absorber.
As a general rule, cleaning and replacement of seals should be performed once a year.
The internal maintenance operation, which involves replacing the seals, the lubricating oil, and cleaning the cartridge, should be carried out annually. However, this interval can be shortened depending on frequency of use or the type of shock absorber. For enduro and downhill models, for example, it should be done twice a year.
And what about coil shocks?
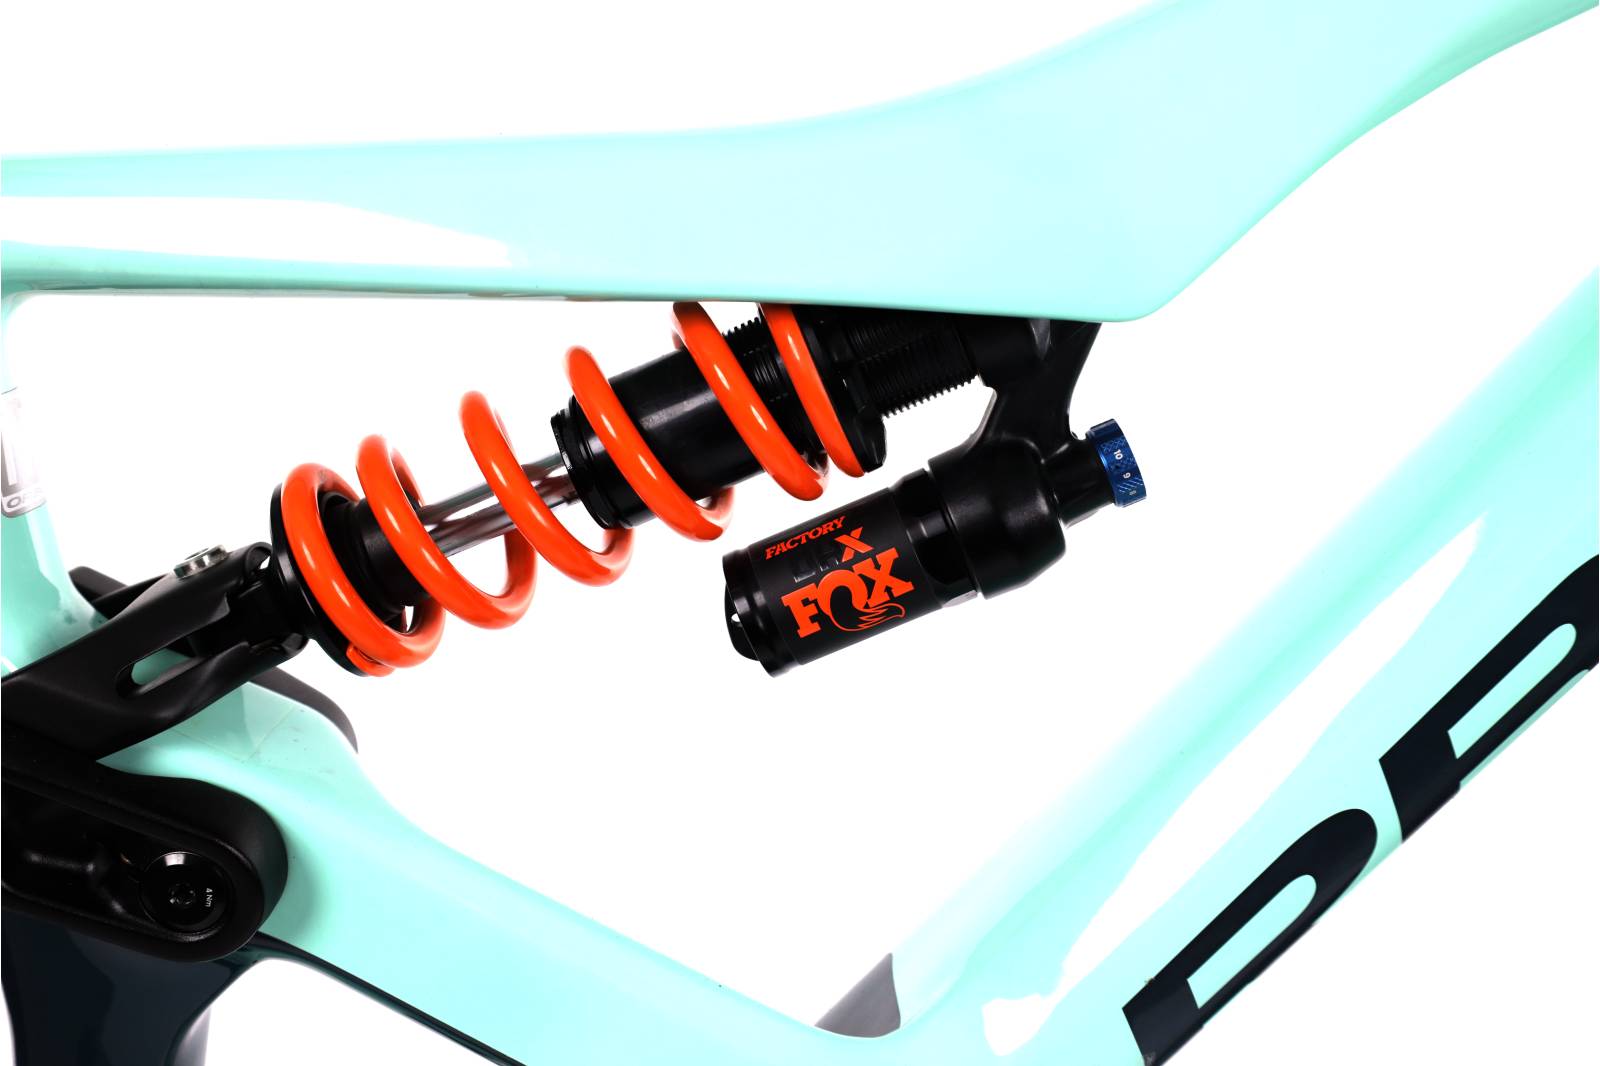
In radical MTB disciplines such as enduro or downhill, it is common to see coil shocks installed, instead of air shocks, which are much more widespread in current builds. The adjustments, maintenance, and cleaning are very similar to those of air shocks, and even simpler. In this case, the SAG is not adjusted with an air pump, but is calibrated using a nut that compresses the spring more or less, as well as the compression or rebound. Likewise, dials allow you to control the oil flow in and out of the hydraulic cartridge, in the more advanced models. In this way, both the speed and firmness of the suspension are adjusted.